Finding an underground sprinkler line leak starts with isolating which zone is losing water, then walking the pipe path for that zone while it runs and looking for surface signs — soft or soggy ground, water bubbling up through turf, unexplained wet spots, or a distinctly greener stripe of grass growing over the leak point. Most residential sprinkler line leaks can be located within one to two irrigation cycles of methodical observation without any specialized tools. The critical first step is confirming the leak is in a zone line rather than in the pressurized main line before the backflow preventer — a main line leak runs continuously regardless of whether any zone is running, while a zone line leak only loses water when that specific zone is active or, in the case of a stuck-open valve, continuously after a zone fails to close.
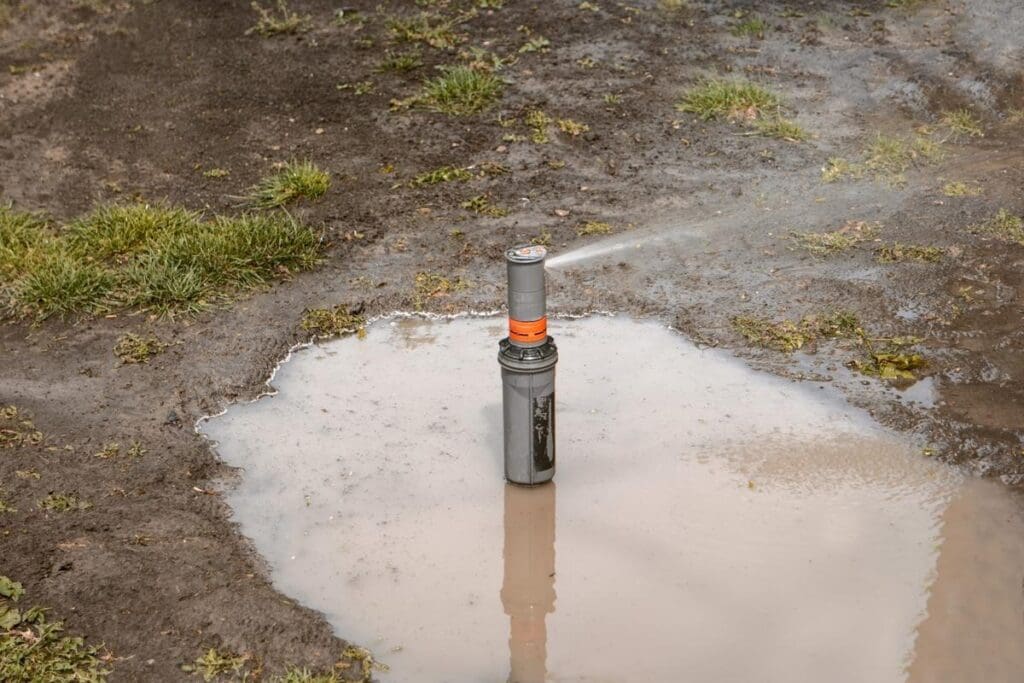
An active sprinkler line break creating a geyser in a residential lawn — one of the more dramatic and easy-to-locate leak scenarios. Most underground irrigation leaks are far less visible than this: a slow seep from a cracked PVC fitting or a pinhole in polyethylene pipe that shows up as a persistently wet area in the lawn, a lower-than-normal pressure zone, or a water bill that has quietly increased over several billing cycles. Identifying the zone and walking the pipe path are the reliable starting points for locating either type.
Step 1: Confirm It Is an Irrigation System Leak
Before assuming the wet area or high water bill is caused by an irrigation line leak, rule out two other common sources of yard moisture that are frequently confused with irrigation leaks:
Check your water meter when the irrigation system is completely off. Turn off the irrigation controller, wait 30 minutes to let any post-cycle drainage clear, then check the water meter. Most residential meters have a small leak indicator — a small dial, triangle, or spinning wheel that moves even at very low flow. If the meter indicator is moving with all water use in the house stopped and the irrigation off, there is an active pressurized leak somewhere in the system. If the meter is not moving, the irrigation system is not currently leaking under pressure (though it may still have a zone line crack that only leaks during active cycles).
Confirm it is not low-head drainage. If the wet area appears near sprinkler heads at the low points of a sloped zone for 30 to 60 minutes after a cycle ends and then gradually drains away, you are likely seeing low-head drainage — gravity-driven water flowing out of the pipe through the lowest heads after the zone valve closes. This is not a pipe leak; it is a check valve issue. See our blog post on sprinkler head base leaks for the specific fix. True underground line leaks either appear continuously (main line or stuck-open valve) or correlate precisely with a specific zone running.
Consider Oklahoma’s weather context. Wet areas that appear after rain and drain within 24 to 48 hours are normal for Tulsa-area clay soil, which drains slowly by regional standards. A genuine irrigation line leak is persistent — it appears on dry days when no rain has fallen, it does not drain away within a normal post-rain timeframe, and it correlates with irrigation activity rather than rainfall.
Step 2: Isolate the Leaking Zone
If the water meter confirms a leak exists, the next step is determining whether it is in the main supply line or in one of the zone lines. This isolation step tells you how urgently the system needs to be shut down and how to approach the search.
To test whether the leak is in the main supply line (always pressurized) or in a zone line (only pressurized when that zone runs):
- Close the manual shut-off valve on the backflow preventer or the irrigation main supply valve. This removes pressure from the entire irrigation system including the main line up to the backflow preventer.
- Watch the water meter indicator with this valve closed. If the indicator stops moving, the leak is downstream of the shut-off in the irrigation system — either in the main manifold area, a zone line, or a valve that is not fully closing. If the meter continues moving with the irrigation supply closed, the leak is in the domestic supply line between the meter and the house, which is a different repair involving a plumber.
- With the main supply restored, run each zone individually from the controller for two to three minutes each. After each zone completes, check the water meter. A zone that is actively leaking will show disproportionate meter movement during its run cycle. A zone with a stuck-open valve will show meter movement after its scheduled run has ended — the meter keeps moving because the valve did not close fully.
- Mark the zone or zones showing abnormal meter movement. This tells you exactly which pipe path to search.
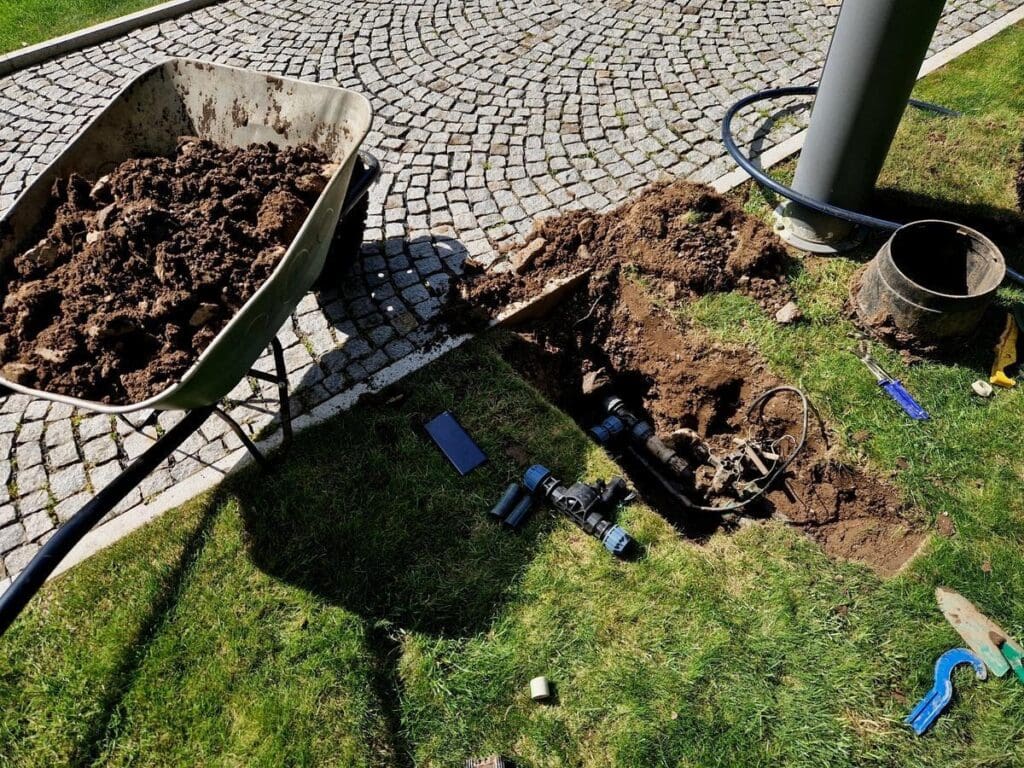
An irrigation zone valve excavated for replacement during a line leak repair — the wheelbarrow of Oklahoma clay soil excavated to access the valve manifold is typical of the digging required to reach buried irrigation infrastructure. Zone valve replacement is the professional solution when a valve that is stuck open or failing to close is the source of an apparent “line leak” — continuous meter movement even when no zone is scheduled to run often traces to a faulty valve diaphragm rather than a pipe crack.
Step 3: Walk the Zone Line Path During an Active Run
With the leaking zone identified, the search area narrows to the pipe path for that zone — from the zone valve to the farthest sprinkler head on the circuit. Running the zone and walking that path systematically is the most reliable low-tech method for locating the breach.
What to look for while walking a running zone:
- Soft, spongy, or unusually wet ground along the pipe path between heads. On dry days when no rain has fallen, a section of turf that is noticeably softer underfoot than the surrounding area indicates water is saturating the soil from below — the classic sign of a subsurface pipe leak.
- Water surfacing through the turf. Depending on the pressure and the size of the crack, water may bubble up visibly through the grass surface directly over the leak point. This is more obvious on sandy soil; on Tulsa-area clay, the water may travel laterally underground before surfacing at a low point, meaning the wet spot may not be directly over the leak.
- Depressed or sunken ground along the pipe trench. A slow, long-term leak gradually erodes soil structure along the pipe path. Over months or seasons, this can produce a subtle linear depression in the turf surface that follows the pipe path — visible if you look for it, often overlooked otherwise.
- Distinctly greener or more lush grass in a linear stripe. Grass growing over a leaking pipe receives more water than the surrounding lawn and often shows as a noticeably greener, denser, or faster-growing strip. During summer stress periods when Bermuda or Zoysia on non-irrigated areas is showing heat stress, a persistently green stripe is a reliable indicator of a subsurface moisture source — which may be a leaking pipe.
- Reduced spray distance at heads near the leak. A crack that is losing significant pressure will reduce the available pressure for heads downstream of it. If the heads at the far end of a zone spray shorter distances or perform noticeably weaker than heads near the valve, the pressure loss is occurring somewhere along the line between the strong-performing heads and the weak ones.
| The Oklahoma Freeze Damage Timing WindowThe majority of PVC sprinkler line cracks in the Tulsa area are caused by freeze damage.Water expands as it freezes, cracking PVC fittings and pipe sections that retained water through a hard freeze.Damage from a December or January freeze event often does not show up as a visible leak until spring startup.If your irrigation system was not properly winterized before the first hard freeze, inspect the entire system carefully at spring startup — don’t wait for a wet spot to appear before running a zone-by-zone pressure check.Flex riser connections and above-grade fittings near heads are the most common freeze crack locations.PVC tee fittings and elbow joints are more vulnerable to freeze cracking than straight pipe sections. |
Step 4: Pinpoint the Exact Location
Once you have narrowed the search to a section of the pipe path — a 10 to 20 foot stretch where the surface symptoms are concentrated — pinpointing the exact leak location before digging avoids unnecessary excavation in Tulsa-area clay, which is heavy to move and slow to restore.
Several techniques narrow the location further:
Shut off the zone and listen. With the zone off and the system quiet, kneel or lie close to the wet area and listen for the sound of water moving through soil. A pressurized leak from a stuck-open valve, or a leak in the main line, will produce a faint hissing or trickling sound audible with an ear close to the ground surface. This works better in clay than in sandy soil because the sound travels differently — but in quiet conditions, active leaks above a threshold flow rate are often audible within a few inches of the leak point.
Probe the wet area. Use a thin metal probe — a long screwdriver or a dedicated lawn probe — to probe the wet zone at 6-inch intervals. The probe will encounter less resistance over the pipe path (disturbed trench soil is looser than undisturbed surrounding soil) and no resistance at a crack or failed fitting where water has eroded surrounding soil. When the probe drops into an unexpected void, that is typically the leak location.
Run the zone briefly and watch for the initial wet point. If you have identified a suspect area, allow the zone to dry for 24 hours, then start it again and immediately watch the suspect area for the first point where water appears. On a crack or failed fitting, water surfaces at the breach first — the visible wet area then expands outward from that point. The center of expansion is usually within inches of the actual crack.
Pressure testing. An irrigation professional can perform a pressure test on the isolated zone — capping the zone at the valve, applying a known pressure, and monitoring pressure drop over time. A zone with a crack loses pressure continuously; a zone with a closed-valve integrity issue shows different pressure behavior. This is particularly useful for locating slow leaks that are not producing obvious surface symptoms.
A pop-up head in a flooded, muddy area — a severe leak scenario where the head itself has been displaced or the riser connection has failed, producing a pooling situation rather than normal spray coverage. Head riser failures, cracked head bodies from mower impact, and failed flex riser connections are the most common above-grade leak points and are straightforward DIY repairs. Below-grade pipe cracks and failed PVC fittings require excavation and are best handled by an irrigation professional for most homeowners.
Common Underground Leak Causes in Tulsa-Area Systems
Understanding what typically causes underground sprinkler leaks in this region helps focus the search. The most common causes roughly in order of frequency:
Freeze damage to PVC fittings and pipe. Oklahoma’s winters reliably produce hard freezes that crack PVC irrigation components when systems are not properly winterized. Tee fittings, elbows, and sections of pipe near heads — where water tends to remain after a cycle — are the most vulnerable. The damage is usually a hairline crack or a split along a fitting joint that may not be obvious until the system is pressurized at spring startup. Systems that lose their winterization record from previous owners are at particularly high risk of having accumulated freeze damage that has never been addressed.
Root intrusion and pipe displacement. Tulsa-area yards with mature post oaks, water oaks, pecan trees, and large ornamental trees develop extensive root systems that gradually displace and stress buried PVC irrigation pipe. A pipe that has been shifted by root growth develops stress cracks at fittings and joints where the movement is concentrated. Root-caused damage is more common on older systems and tends to show up in zones running near established trees.
Mower and edger damage to risers and heads. Impact from mowing equipment is the most common cause of above-grade failures — cracked head bodies, broken riser connections, and flex riser failures where the riser connection is sheared. This type of leak is typically visible because the damage is at or near grade level and produces obvious surfacing water rather than a subsurface seep.
Age-related PVC joint failure. PVC cement joints have a functional lifespan. In systems installed in the late 1990s and 2000s — which includes a significant portion of existing residential irrigation in Tulsa, Broken Arrow, and Bixby — original cement joints are now 20 to 25 years old. Joint failures in aging systems are more common and tend to occur at the locations of highest stress: where the line changes direction at a fitting, where the pipe transitions between sections of different depth, and where ground movement from Oklahoma’s expansive clay has repeatedly stressed the connection.
Leak Symptom Quick Reference
Matching what you see to what is likely causing it:
| Symptom | Likely Cause | Notes and First Step |
| Wet spot or soggy area when zone is off | Pressurized line crack or failed fitting | Zone valve is not fully closing OR line is under constant pressure from a stuck-open valve — confirm by checking if all zones are off at controller |
| Wet spot appears only during zone cycle | Pipe crack or failed fitting in zone line | Most common post-freeze failure; locate by zone isolation and surface observation during active run |
| Geysering at a head location | Broken riser or head body at that location | Mower damage most common cause; DIY repair with replacement head and riser |
| Zone pressure noticeably lower than normal | Active leak somewhere in zone line losing pressure | Walk the zone line path while running; look for soft ground, bubbling, or unexplained wet areas |
| Water meter spinning when all zones are off | Pressurized main line leak before the backflow preventer OR stuck-open zone valve | Confirms active leak; locate the zone valve causing it or call professional for main line trace |
| Unexplained green stripe across lawn | Slow subsurface leak along pipe trench path | Grass over a leaking pipe is often greener and more lush than surrounding turf; walk the zone line paths |
DIY Repair vs. Professional Service
Some underground sprinkler line repairs are genuinely DIY-accessible; others are better handled professionally. The practical distinction:
DIY-accessible repairs: Flex riser replacement at a head location (dig around the head, disconnect the old riser, connect the new one), head body replacement where the riser is intact and accessible, and zone valve issues where the valve body is in an accessible box and the repair is solenoid or diaphragm replacement. These repairs require no special tools and involve components that are cheap and widely available at Tulsa-area hardware stores.
Professional territory: Pipe cracks in the main zone line that require excavating along the pipe path to locate and access the break point, PVC fitting replacements that require cutting into the line and installing a repair coupling with PVC cement, pressure testing to locate slow leaks, and any repair near the backflow preventer or water main connection point. These are not technically complex repairs for someone with plumbing experience, but they require correct fitting selection, PVC cement technique, and appropriate cure time before the system is pressurized — and mistakes result in excavating the same area twice.
For Oklahoma freeze damage specifically: if the spring startup reveals that a zone is not holding pressure or multiple heads on a zone are performing weakly across the board, the damage is often distributed across multiple fittings rather than concentrated at a single point. Locating and repairing all damage from a single freeze event typically benefits from a professional systematic inspection rather than a piecemeal DIY approach.
Irrigation Leak Detection and Repair in the Tulsa Area
With over 25 years serving homeowners throughout Tulsa, Broken Arrow, Bixby, Jenks, Owasso, and Sand Springs, Complete Lawn Care provides irrigation repair, leak detection, and seasonal service for all major residential irrigation systems. Our irrigation team uses pressure testing and zone isolation techniques to accurately locate underground leaks before excavating — minimizing digging and getting the system back in service efficiently.
We bring the same science-based, intentional approach to irrigation service that guides every aspect of our lawn care work. Understanding the cause before recommending the fix. Using the right tools and materials for Oklahoma’s soil and weather conditions. Making repairs that hold up through the freeze-thaw cycles and soil movement that Tulsa-area systems face every year.
Our programs are continually refined based on real-world results. An irrigation system that is leaking underground is wasting water, creating chronic drainage problems that affect turf health, and potentially damaging hardscape and foundation areas near the leak point. Getting it found and fixed is worth prioritizing.
Suspect an Underground Leak in Your Sprinkler System?
Contact Complete Lawn Care at completelawncaretulsa.com or call (918) 605-4646. We will help you locate the leak and fix it the right way.
Experience. Science. Intentional Lawn Care — That’s the Complete Lawn Care Difference.