Serving Tulsa, Broken Arrow, Bixby, Jenks, Owasso & Sand Springs
completelawncaretulsa.com | (918) 605-4646
How Do I Adjust the Spray Pattern on a Pop-Up Sprinkler Head?
How you adjust a pop-up sprinkler head depends on the type of head you have. Fixed-spray heads use preset arc nozzles — adjusting the spray direction means physically rotating the head body, and changing the arc width means swapping the nozzle for one with a different arc designation. Rotor heads are adjustable without nozzle replacement: a small set screw on top of the stem controls the arc width and direction using a flat-head screwdriver or a brand-specific key tool, while the zone is running. Adjustable arc nozzles — a third type now common in both new installation and upgrade applications — allow arc width changes via a top screw without replacing the nozzle at all. Knowing which type you have takes about thirty seconds of looking, and the adjustment steps after that are straightforward for all three.

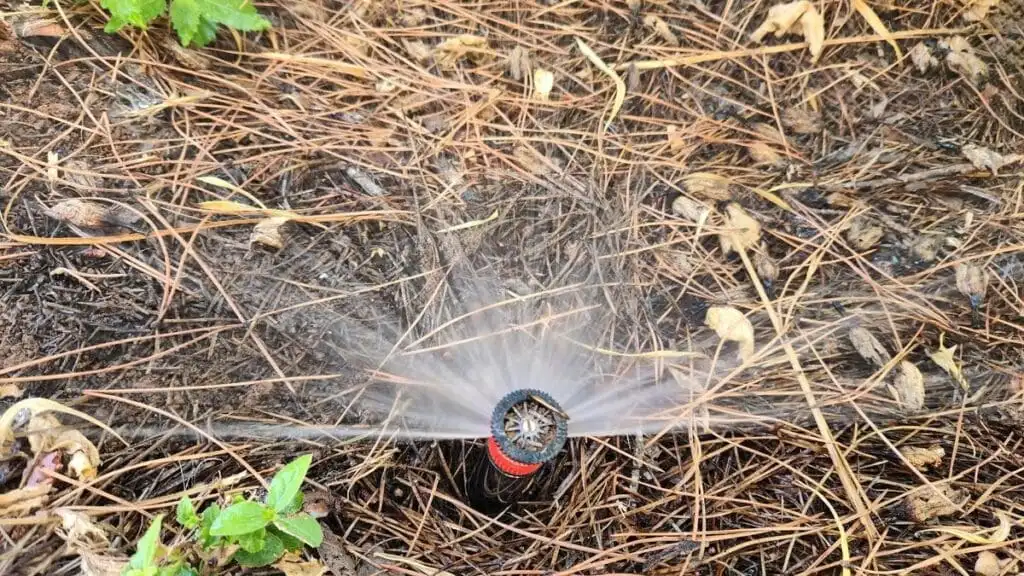
A fixed-spray head in a landscape bed delivering a 180-degree fan pattern across a mulched area. The red collar on this head indicates a specific arc designation — manufacturers use color coding on nozzle collars to identify arc and radius combinations at a glance. On this head type, changing the spray direction means rotating the head body; changing the arc means replacing the nozzle with a different color-coded version.
Step 1: Identify What Type of Head You Have
The adjustment method is entirely determined by head type. The three types you will encounter in Tulsa-area residential irrigation systems:
Fixed-spray heads: The most common type in residential beds and shorter-radius lawn zones. They spray in a fixed fan pattern — the water does not move during operation. When the zone runs, the nozzle delivers a stationary arc of water. The nozzle is a separate piece that threads onto or snaps into the top of the pop-up stem. You can see the nozzle color code on the top of the head (common Rainbird nozzle colors: red = 180 degrees, blue = 90 degrees, gray = 270 degrees, black = 360 degrees; Hunter uses a similar but not identical color convention). These heads cannot be adjusted for arc width without replacing the nozzle.
Rotor heads: Rotor heads rotate during operation — you can see the stream moving back and forth across the coverage area when the zone runs. They cover longer distances (typically 15 to 40 feet for residential rotors) and are commonly used on larger lawn zones. The adjustment mechanism for arc and direction is built into the head body and accessible from the top of the stem with a screwdriver or brand key tool. Both the width of the arc and the direction it faces can be adjusted without removing or replacing any parts.
Adjustable arc nozzles (MP Rotators and similar): These are fixed-spray head bodies with a rotating multi-stream nozzle installed on top. They look like a fixed-spray head but produce multiple thin rotating streams rather than a fan pattern. The arc width on these nozzles can typically be adjusted via a collar or set screw on the nozzle itself. They are increasingly common in Tulsa-area residential systems as retrofit upgrades because they apply water at a lower precipitation rate — better suited to clay soil that cannot absorb water as fast as a standard fan nozzle delivers it.
Adjusting a Fixed-Spray Head: Direction Change
If the spray direction on a fixed-spray head is wrong — pointing toward the house, spraying onto hardscape, missing the intended area — the fix is rotating the head body so the nozzle faces the correct direction. The nozzle is positioned on the top of the stem, and the direction it faces determines where the spray goes.
To change the spray direction on a fixed-spray head:
- Run the zone so the head is under full operating pressure and fully extended. Adjustments made with the head retracted are difficult to evaluate accurately.
- Grip the head body — not the stem — and rotate the entire body in the direction you want to move the spray. The body threads onto the riser fitting below, so rotation changes the direction the nozzle faces. On some heads, the body and stem are keyed together; on others, the stem can be held and the body turned independently.
- If the body will not rotate while pressurized, shut off the zone, unscrew the head body from the riser, rotate it to the desired direction, and reinstall. This is sometimes necessary on older heads where the body has not been rotated in years.
- Recheck direction while the zone is running before backfilling or making any other adjustments. The spray pattern should now cover the intended area without directing water onto hardscape, structures, or outside the target zone.
Important limitation: the arc direction on a fixed-spray head can only be moved through the range of the installed nozzle. A 90-degree nozzle covers a 90-degree arc regardless of which direction it faces. If the shape of the area requires a different arc — for example, a 90-degree corner needs a 90-degree nozzle; a half-circle lawn edge needs a 180-degree nozzle — the nozzle itself needs to be replaced.
Adjusting a Fixed-Spray Head: Arc Width Change (Nozzle Replacement)
Changing the arc coverage of a fixed-spray head requires swapping the nozzle. Nozzles for the most common residential brands — Rainbird 1800 series, Hunter Pro-Spray, Toro 570 — are sold individually at hardware stores and irrigation supply companies throughout Tulsa and are inexpensive ($1 to $3 each for standard nozzles).
The nozzle replacement process:
- Identify the brand and series of your head body. Nozzles are not universally cross-compatible. A Rainbird nozzle may fit a Rainbird 1800 body but not a Hunter Pro-Spray body. The brand name is typically embossed or printed on the head body housing. When in doubt, bring the old nozzle to the hardware store for matching.
- Shut off the zone and pull the stem up manually or run the zone and hold the stem extended with a towel — whichever allows easier access to the nozzle.
- Unscrew or unclip the nozzle from the stem. On most heads, the nozzle threads off counterclockwise. Some brands use a press-fit with a retaining clip. Note the position of the nozzle before removal so you know which direction the new one should face.
- Install the new arc nozzle in the correct direction. Firmly seat it and confirm it is snug — a loose nozzle will produce misting and may unscrew during operation.
- Run the zone and verify the new arc covers the intended area. If you also need to change the direction, rotate the head body after confirming the arc width is correct.
| Fixed-Spray Nozzle Arc Quick Reference90-degree (quarter circle): Corner locations, square bed corners, fence line ends.180-degree (half circle): Straight edges — lawn borders along sidewalks, driveways, and bed edges.270-degree (three-quarter circle): L-shaped corners where a half and a quarter would leave gaps.360-degree (full circle): Center of islands, circular beds, open areas surrounded by target zone.Adjustable arc nozzles (e.g., Rainbird U-series): Set anywhere from 45 to 270 degrees with a top screw.Color codes vary by brand — always verify by brand, not by color alone.Matched precipitation rate: use same series nozzles throughout a zone for uniform water distribution. |

A technician adjusting a rotor head with a flat-head screwdriver while the zone is running — the correct method for rotor arc and direction adjustment. With the head at full operating pressure and the stream visible, adjustments can be made in real time and verified immediately. Most residential rotor adjustments take under a minute once the technique is understood.
Adjusting a Rotor Head: Arc and Direction
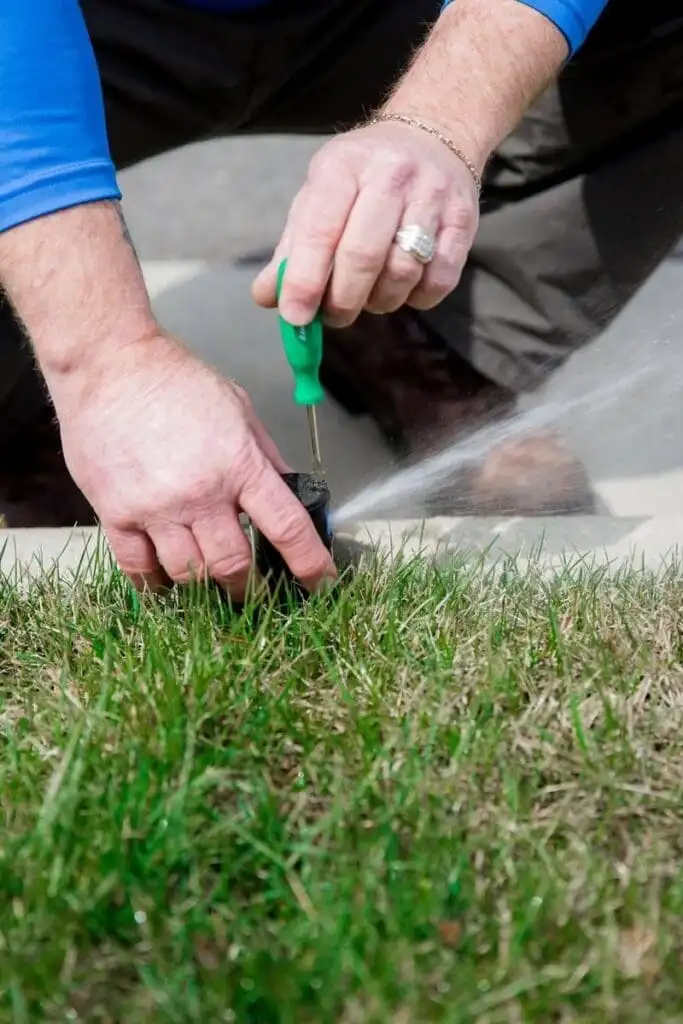
Rotor head adjustment is more flexible than fixed-spray head adjustment because both arc width and direction can be changed without replacing any parts. The adjustment mechanism is accessed from the top of the extended stem while the zone is running — making real-time verification possible. The exact process varies slightly by brand, but the underlying logic is the same for all residential rotor heads.
Understanding rotor arc mechanics: Rotor heads have two arc stops — a fixed left stop and an adjustable right stop. The rotor stream travels back and forth between these two stops. The direction the head faces determines where the fixed left stop points. Adjusting the right stop changes how wide the arc is. These two adjustments together let you position the spray coverage precisely.
For Rainbird rotor heads (5000 series and similar, the most common rotor in Tulsa residential systems):
- Adjust the left stop (overall direction): With the zone running and head at full rise, grip the outer collar of the stem body and rotate it. The entire rotating mechanism and arc will shift with it. Rotate left or right until the left edge of the arc aligns with the left edge of your intended coverage area.
- Adjust the right stop (arc width): Insert a flat-head screwdriver into the adjustment slot on top of the stem. Turn clockwise to decrease arc width; counterclockwise to increase arc width. The arc adjusts in both directions — you can reduce a 270-degree arc to 90 degrees or expand a 90-degree arc to 270 by turning the screwdriver. Make small adjustments and observe the change before continuing.
- Verify both edges of coverage while the zone is running. The left edge should align with the left boundary of the target area; the right edge should align with the right boundary. Adjust as needed until coverage matches the intended zone.
For Hunter rotor heads (PGP and similar): The adjustment process is similar but some Hunter models require a proprietary key tool (the Hunter SRS rotor adjustment tool) rather than a flat-head screwdriver. This small tool is inexpensive and available at irrigation supply stores. Attempting to adjust without the correct tool can damage the adjustment mechanism.
For Toro rotor heads: Toro residential rotors typically use a flat-head screwdriver for arc adjustment. The direction of rotation for increasing versus decreasing arc is opposite to Rainbird on some models — check the embossed arrow indicators on top of the stem before adjusting, as these indicate the correct rotation direction for that specific head.
The Most Common Adjustment Mistake: Wrong Direction of Rotation
The most frequent error when adjusting rotor heads — particularly by homeowners doing it for the first time — is rotating the adjustment screw in the wrong direction and being surprised when the arc does not change as expected or appears to go in reverse. Each brand has a specific convention for which direction increases arc width, and some brands vary by model series within the same brand.
The reliable method: when you first start adjusting, make one full clockwise rotation of the screw and observe whether the arc width increased or decreased. If it decreased, counterclockwise is the direction for increasing arc. If it increased, clockwise is correct. Establishing this first with a deliberate test rotation takes fifteen seconds and prevents the confusion of adjusting in the wrong direction for several frustrating minutes.
The second common mistake is adjusting with the zone off and the stem retracted. The adjustment mechanism on most rotors is only properly accessible and verifiable with the stem at full rise under operating pressure. Adjustments made while the head is retracted often shift when the head rises, because the stem rotates slightly as it extends. Always adjust rotor heads while the zone is running.

A fixed-spray head in a sparse turf area delivering a 180-degree pattern at low rise — a configuration common in newly established or thin lawn zones where full coverage is being built up over time. Adjusting the direction on this head type means rotating the body; the half-circle arc is determined by the nozzle installed and cannot be changed without nozzle replacement. When a head like this is spraying in the wrong direction, the rotation adjustment takes under two minutes with the zone running.
When Adjustment Is Not the Right Answer: Replace the Nozzle Instead
Sprinkler head adjustments have limits, and some coverage problems cannot be solved by adjustment alone. These situations call for nozzle replacement or a different head type rather than adjustment:
The existing nozzle arc does not match the area geometry. A 180-degree nozzle installed at a 90-degree corner will always over-spray no matter how it is adjusted. The arc width is fixed by the nozzle type. Replacing with a 90-degree nozzle and pointing it at the corner is the correct fix.
The throw radius is too short or too long for the spacing. Fixed-spray nozzles come in specific throw radius increments — 4-foot, 8-foot, 10-foot, 12-foot, and 15-foot are common residential sizes. A head that cannot reach neighboring heads in the zone has the wrong throw radius nozzle installed, not an adjustment problem. Replacing the nozzle with the correct radius for the head spacing eliminates dry strips between heads.
The nozzle is mismatched to others on the same zone. A zone with mixed nozzle types — some fan spray, some rotors, some MP rotators — cannot produce matched precipitation rates. Each type applies water at a different rate, and the controller run time that adequately waters the rotor portion will underwater or overwater the fixed-spray portion. Matched nozzles throughout a zone are a fundamental requirement for uniform coverage, and no adjustment will substitute for this.
The head is damaged. A cracked or physically deformed nozzle produces erratic spray that cannot be corrected by adjustment. Mowing damage — the most common cause in Tulsa-area yards — often cracks the nozzle face or breaks the adjustment mechanism. Replacement is the correct response.
Head Type and Adjustment Method at a Glance
Quick reference for the head types found in most Tulsa-area residential systems:
| Head Type | What Can Be Adjusted | Arc Change Method | Notes for Tulsa-Area Systems |
| Fixed spray head (standard nozzle) | Spray direction only — rotate head body | Replace nozzle to change arc | Most common in Tulsa-area residential beds and tight lawn areas; nozzles are inexpensive |
| Fixed spray head (adjustable arc nozzle) | Arc width via top screw; direction via head body rotation | No nozzle replacement needed for arc changes | Hunter and Rainbird adjustable nozzles available at most area hardware stores |
| Rotor head (single-stream) | Arc width and direction via adjustment screw on top of stem | Proprietary key tool needed for some brands | Common brand tools: Rainbird rotor key, Hunter SRS tool; check brand before adjusting |
| Gear-drive rotor (multi-stream) | Arc and direction via set screws; check brand instructions | Both left and right arc stops adjustable | More adjustment precision; used on larger zones with wider spacing |
| MP Rotator nozzle on fixed-spray body | Arc via adjustment collar on nozzle; direction via body rotation | No tools needed for most adjustments | Multi-stream rotating nozzles have significantly lower precipitation rate; run time must increase |
Why Correct Spray Patterns Matter for Lawn Health
A misadjusted sprinkler head is not just an annoyance — it is a source of chronic turf problems that can persist for an entire season before the connection between irrigation and lawn health is made. Heads spraying onto hardscape waste water and contribute to sidewalk and driveway staining from mineral deposits in Tulsa area water. Heads with incorrect arc coverage create dry edges just outside the spray radius that show up as persistent brown strips during Oklahoma’s hot summers, even when the rest of the lawn looks fine. Over-spraying in one area while leaving another dry creates conditions where some areas receive stress from too much moisture and others from too little.
An irrigation system that covers the lawn uniformly — with matched precipitation rates, correct arc coverage, and proper head-to-head overlap — directly supports the effectiveness of a science-based lawn care program. Fertilizer applied to a zone with inconsistent irrigation coverage produces inconsistent results. Pre-emergent and post-emergent applications perform differently on chronically wet versus chronically dry areas. Getting the irrigation right is a prerequisite for getting the lawn right.
Complete Lawn Care recommends annual soil testing for every property in our service area, and soil moisture patterns identified through consistent monitoring often reveal irrigation coverage problems that are not obvious from a simple visual inspection. If you are seeing dry edges, persistent wet spots, or uneven color in a zone that appears to be running normally, a spring irrigation inspection is often the most productive first step.
Irrigation Service in the Tulsa Area
With over 25 years serving homeowners throughout Tulsa, Broken Arrow, Bixby, Jenks, Owasso, and Sand Springs, Complete Lawn Care provides irrigation repair, maintenance, and seasonal inspection services for all major residential irrigation brands. Our irrigation team adjusts, repairs, and replaces sprinkler heads as part of our comprehensive irrigation service — and brings the same science-based, intentional approach to irrigation that we apply to every aspect of lawn and turf health.
Our programs are continually refined based on real-world results and agronomic science. That includes how we evaluate irrigation performance — because we adjust throughout the season when turf conditions, weather, and soil biology tell us something is off. Experience tells us what to do. Science tells us when and why.
Sprinkler Heads Not Covering Your Lawn the Way They Should?
Contact Complete Lawn Care at completelawncaretulsa.com or call (918) 605-4646. We serve Tulsa, Broken Arrow, Bixby, Jenks, Owasso, and Sand Springs and will get your irrigation system performing the way it should.
Experience. Science. Intentional Lawn Care — That’s the Complete Lawn Care Difference.