Winterizing a Tulsa-area irrigation system means purging the zone lines with compressed air to remove the water that would otherwise freeze and crack PVC pipe and fittings, protecting the above-grade backflow preventer from freeze damage, and closing the irrigation supply valve for the season. The standard approach is a blowout winterization performed in late October or early November before the first hard freeze — typically around the time overnight temperatures begin consistently dropping below 35 degrees Fahrenheit. But here is something many Tulsa homeowners do not know: you do not have to choose between a fully shut-down system and an unprotected one. With the right equipment — specifically heat tape on the backflow preventer and a freeze or rain sensor connected to the controller — you can keep your irrigation system active through mild Oklahoma winters to water fall and winter landscape plantings, and the system will automatically shut itself off when temperatures threaten the backflow preventer. This article covers both approaches so you can choose the one that fits your property.
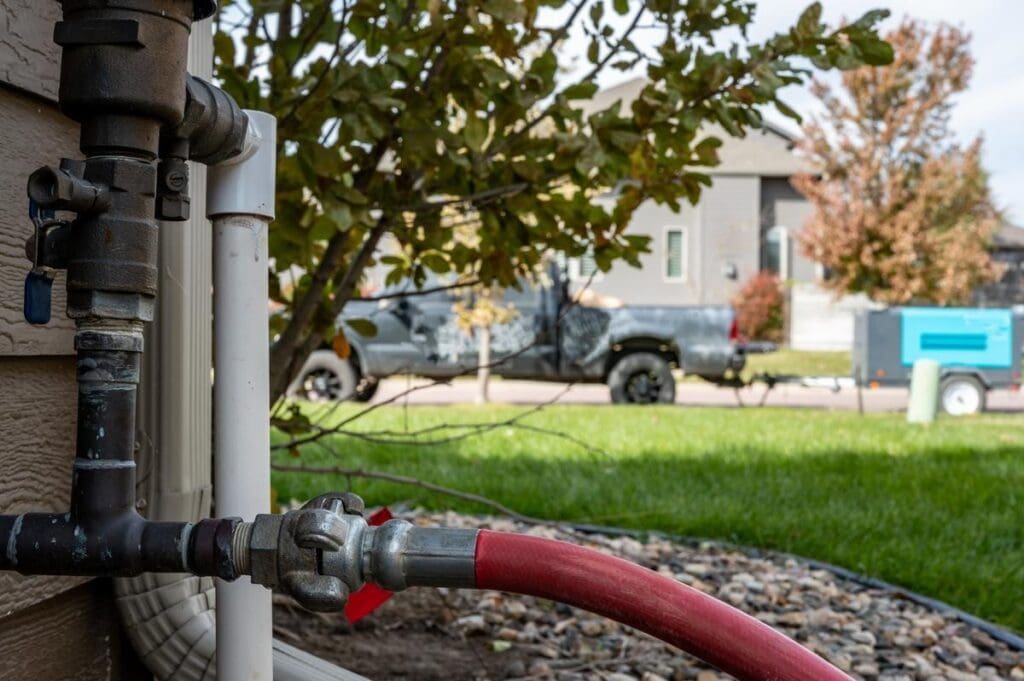
A residential irrigation backflow preventer and supply assembly during winterization — the red hose connects to a compressed air source for the blowout process that purges zone lines. The above-grade supply pipe and backflow preventer are the most vulnerable components in any Tulsa-area irrigation system during winter: buried PVC zone lines are below frost depth and rarely freeze, but the above-grade assembly is fully exposed to ambient temperatures. Protecting this assembly — either by shutting down the system and draining it or by installing heat tape for active winter operation — is the most important single step in Tulsa irrigation winterization.
Why Tulsa Irrigation Winterization Is Different from Northern States
Oklahoma’s climate creates a specific winterization challenge that homeowners who have lived elsewhere sometimes underestimate. Unlike northern states where winter temperatures drop well below zero and irrigation systems are definitively shut down for five or six months, Tulsa winters are highly variable — temperatures swing between warm enough to run irrigation (50 to 70 degrees in November and December) and cold enough to cause catastrophic freeze damage (single digits during arctic events) sometimes within the same week.
Tulsa’s average first hard freeze (below 28 degrees Fahrenheit) falls between November 5 and November 15, but early cold snaps in October are not uncommon, and late-season warmth can extend the irrigation season into November on properties with established landscapes or fall plantings that need water. The average last freeze in spring falls between March 20 and April 5, though late cold snaps extend into April some years.
This variability is why Tulsa-area irrigation winterization is not a single event but a decision with timing implications. The classic mistake is waiting too long — a 70-degree October followed by a sudden hard freeze catches unprepared systems with water still in the pipes. The opposite mistake is winterizing so early that fall landscape plantings go without irrigation through dry November conditions. The solution is either timely blowout winterization (early to mid-November at the latest) or setting up the system for protected active winter operation with the freeze sensor and heat tape approach described in this article.
Option 1: Full Blowout Winterization (Standard Approach)
The compressed air blowout is the most thorough and widely used winterization method for residential irrigation systems in Tulsa. It removes virtually all water from the zone lines, eliminating the primary freeze risk to buried components. Combined with draining and protecting the above-grade components, it provides reliable freeze protection through any Oklahoma winter event.
What the blowout does and why it works: compressed air, introduced into each zone line through the backflow preventer or the irrigation main, pushes the water out through the zone heads. Each zone is run individually from the controller while the air is introduced, forcing the air column through the entire pipe run and expelling water from the heads at the far end. When the heads are running mist and then blowing dry air, the line is adequately purged.
The blowout process — step by step:
- Close the main irrigation supply valve (the manual shut-off valve on the supply line to the irrigation system, typically near the backflow preventer or the point where irrigation splits from the household supply). This isolates the irrigation system from the water supply.
- Connect the compressed air source to the irrigation system at the blowout port — typically a quick-connect fitting on the supply line between the shut-off valve and the backflow preventer, or at a dedicated blowout connection. Use a compressor capable of at least 20 to 25 CFM (cubic feet per minute) at the working pressure — tank compressors typically in the 50 to 60 gallon range. Do not over-pressurize: maximum 50 PSI for polyethylene pipe and 80 PSI for PVC. Exceeding these pressures risks blowing out head bodies and cracking fittings.
- Start from the farthest zone from the valve manifold and work back toward the supply. Activate each zone from the controller for 2 to 3 minutes or until the heads are blowing visible mist, whichever comes first. Do not allow a zone to run dry for extended periods — once the heads are blowing mist and then dry air, move to the next zone. Running a dry zone for extended time can damage head bodies and wiper seals through heat buildup.
- Run each zone 2 to 3 times through the sequence to ensure complete evacuation. On the final pass, the heads should blow primarily dry air with no water evident.
- Drain the backflow preventer. Open the small test cocks (the small petcock screws on the backflow preventer body) to drain any water retained in the preventer housing. Leave the test cocks slightly open or remove them entirely and store them inside for winter — this prevents any residual moisture from collecting and freezing in the preventer body.
- Close or insulate the supply shut-off valve. Leave the main irrigation supply valve closed. Wrap any above-grade supply pipe, the backflow preventer housing, and the shut-off valve assembly with foam pipe insulation or self-adhesive pipe wrap as a secondary protection against radiation cooling during extreme cold events.
- Set the controller to the Off or Rain/Off position. Do not simply delete all programs — set the controller to the system-off mode so it does not attempt to run zones during the winter. Leave the controller plugged in if it is a digital controller with programming memory; unplugging it may erase the zone settings that you will want restored at spring startup.
| Tulsa Blowout Timing RecommendationOptimal window: late October through the first two weeks of November.Trigger: when overnight forecasts begin consistently showing temperatures of 35°F or below.Do not wait for: the first official hard freeze. By then it may be too late for the backflow preventer.Early is always safer than late: a system winterized in mid-October loses nothing in terms of spring performance; a system caught unprepared in a November freeze loses pipe fittings and backflow parts.Year-to-year timing varies: monitor the 10-day forecast in late October each year rather than using a fixed calendar date, since Tulsa’s first freeze date varies by two to three weeks across years. |
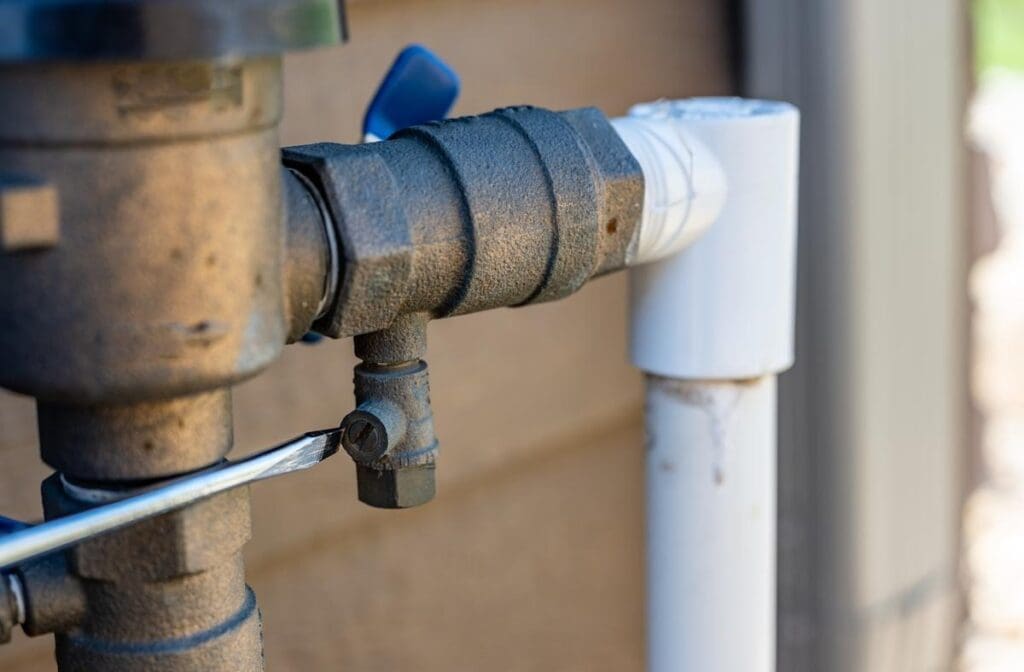
A backflow preventer assembly showing the test cock port being accessed with a screwdriver — the small petcock fittings on the preventer body allow complete drainage of the internal check valve chambers. Leaving these test cocks open or removed over winter prevents water from accumulating in the preventer housing during freeze-thaw cycles. This is the most commonly skipped step in DIY winterization and the one that most often results in a cracked backflow preventer discovered at spring startup.
Option 2: Active Winter Operation with Freeze Protection (The Alternative Most People Don’t Know About)
Full blowout winterization is not the only choice for Tulsa-area homeowners. If you have fall and winter landscape plantings — established ornamental beds, newly planted trees and shrubs, winter annuals like pansies and snapdragons, or containers that benefit from occasional watering during dry Oklahoma winters — shutting the system down entirely in November means hand watering or watching plants go dry during extended rainless stretches. There is a better option.
With the right combination of two components, you can keep your irrigation system fully operational through Oklahoma’s mild winter periods while being automatically protected from freeze damage:
Component 1: A freeze sensor or rain/freeze sensor on the controller. A freeze sensor is a small device that mounts in a shaded location (typically on the eave or north side of the house near the controller) and monitors ambient temperature. When temperature drops to the sensor’s set point — typically 37 to 40 degrees Fahrenheit — the sensor interrupts the controller signal and prevents any zones from running, exactly as a rain sensor does during precipitation. When temperature rises above the set point, the system resumes normal scheduled operation. A combination rain/freeze sensor handles both conditions with a single device and is the most practical choice for year-round Tulsa irrigation. Installation takes about 30 minutes and connects to the sensor terminals on the irrigation controller using the same wiring approach as a rain sensor.
Component 2: Heat tape on the backflow preventer. The backflow preventer is the only component of a residential irrigation system that is truly vulnerable to freeze damage during normal Oklahoma winters. Buried zone lines sit below the frost depth and do not freeze in typical Tulsa winters. The above-grade backflow preventer assembly — exposed to ambient temperatures — is the critical point. Heat tape (self-regulating electrical heat cable) wrapped around the backflow preventer body, supply pipe, and shut-off valve assembly, covered with foam pipe insulation, keeps the preventer above freezing during cold snaps. Self-regulating heat tape automatically increases heat output as temperature drops and reduces it when temperature rises — it does not require a separate thermostat or manual control, and it is safe to leave installed year-round.
With both components in place, the system operates as follows during an Oklahoma winter:
- During mild periods (above 40°F), the irrigation controller runs normally on whatever schedule you have set for winter landscape watering — typically reduced frequency compared to summer, perhaps once every two to three weeks during dry periods.
- When a cold front arrives and temperatures drop toward freezing, the freeze sensor cuts off controller output before any irrigation runs in freezing conditions, preventing ice formation on hardscape and protecting the zone lines from filling with water that might freeze in a shallow section.
- The heat tape on the backflow preventer activates automatically as the temperature drops, maintaining the above-grade components above 32 degrees regardless of ambient temperature.
- When the cold front passes and temperatures moderate, the freeze sensor resets, the heat tape reduces output, and the system returns to normal scheduled operation without any intervention from the homeowner.
This approach is particularly well-suited to Tulsa’s climate because Oklahoma winters spend the majority of their time in the 40 to 60 degree range — cold enough that standard summer irrigation schedules are inappropriate, but warm and dry enough that landscape plants benefit from occasional watering. The system stays available for those applications while being reliably protected during the cold events that would damage an unprotected system.
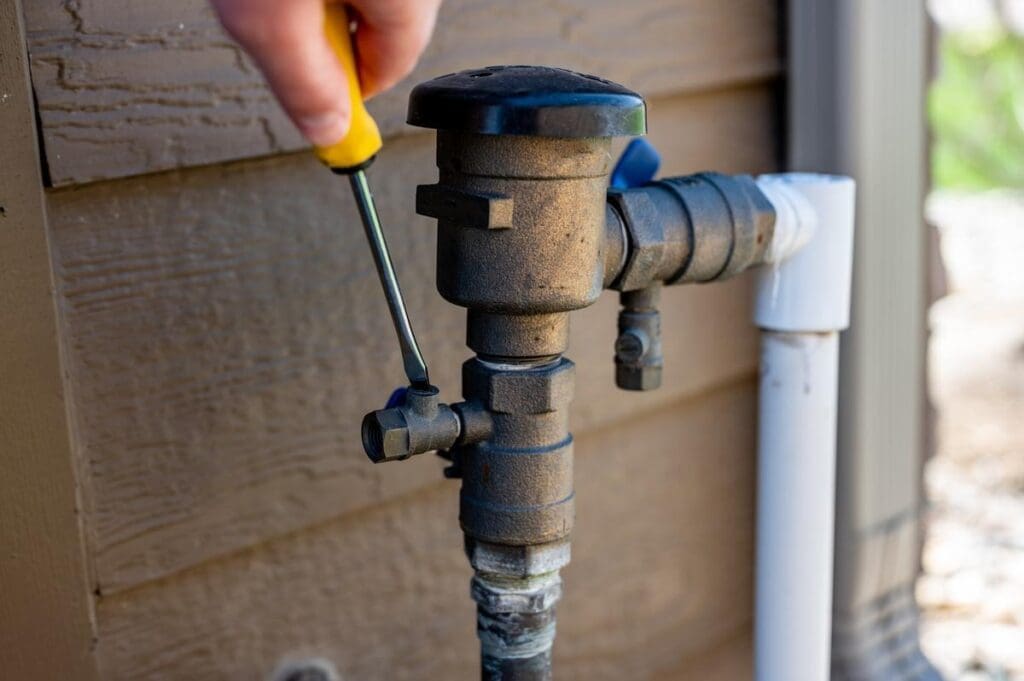
A backflow preventer assembly with the test cock access being serviced — this type of reduced pressure zone (RPZ) backflow preventer is common on Tulsa-area residential irrigation systems installed since the mid-2000s. Heat tape installation on this assembly requires wrapping the heat cable around the entire preventer body, supply pipe, and shut-off valve assembly from below grade to the top of the preventer, then covering with foam pipe insulation secured with foil tape. A properly insulated and heat-taped backflow preventer can withstand extended periods well below zero Fahrenheit without damage.
Heat Tape Installation on a Backflow Preventer
Installing heat tape on a backflow preventer is a DIY-accessible project for most homeowners comfortable with basic electrical connections. The components are available at hardware stores and plumbing supply companies throughout the Tulsa area:
- Self-regulating heat cable: purchase enough linear feet to wrap the entire backflow preventer assembly from the point where the supply pipe exits the ground to the top of the preventer housing. A standard residential backflow preventer assembly is typically 18 to 30 inches tall; add 12 inches for the supply pipe below grade at the entry point. Self-regulating cable rated for outdoor pipe freeze protection — typically 3 to 5 watts per foot — is the appropriate product. Do not use constant-wattage heat tape (the older style wound around a fiberglass core) on irrigation applications; it does not self-regulate and can overheat.
- Foam pipe insulation: sized to fit the backflow preventer supply pipe diameter. Split foam pipe insulation wraps the heat tape and pipe assembly, significantly reducing the heat energy required to maintain temperature above freezing.
- Foil tape or zip ties: to secure the insulation around the assembly and seal the seams.
Installation: wrap the heat cable in a spiral around the backflow preventer body and connecting pipe, following the manufacturer’s recommended spacing (typically 6 to 8 inches of cable per linear foot of pipe for ambient temperatures to minus 20 degrees Fahrenheit). Plug the cable into a weatherproof outdoor outlet — most residential systems have an outlet near the controller or garage. Cover the cable with foam pipe insulation and seal with foil tape. The heat tape operates automatically throughout winter without any further attention.
Choosing Between Full Winterization and Active Winter Operation
Both approaches are appropriate for Tulsa-area residential irrigation. The right choice depends on how you use the system and what you are protecting:
Choose full blowout winterization if: Your landscape is dormant in winter and plants do not need supplemental irrigation; you are not home during winter and cannot monitor the system; or you prefer a simple, zero-risk approach and the convenience of spring startup as a clean reset.
Choose active winter operation with freeze protection if: You have winter landscape plantings (pansies, snapdragons, ornamental kale, newly planted trees and shrubs) that benefit from occasional irrigation during dry periods; your property has established ornamental beds that need water in dry spells; or you want the flexibility to water when needed without hand watering through the winter months.
Note: active winter operation is not a substitute for blowout winterization during an extreme weather event. If the forecast shows an extended period of temperatures below 10 to 15 degrees Fahrenheit — which occurs several times per decade in the Tulsa area — consider performing a blowout winterization before that event even if you have heat tape installed. Heat tape rated for minus 20 degrees will handle the backflow preventer, but the zone lines (which should not have water in them during freeze events anyway) are best purged before any extended hard freeze.
Irrigation Winterization Approaches at a Glance
Comparing the main winterization options for Tulsa-area residential systems:
| Approach | Timing for Tulsa | What It Means |
| Full winterization (blowout) | Late October through mid-November before first hard freeze | System completely shut down; pipes purged with compressed air; controller set to off. No irrigation possible until spring startup in March-April. |
| Active winter with freeze protection | Any time before first hard freeze (October) | System stays active; backflow preventer protected with heat tape and insulation; freeze/rain sensor installed; system shuts off automatically below 37-40°F. |
| Partial winterization | November after hard frost but before deep freeze | Zone lines drained or purged; only above-grade components (backflow, supply valve) protected. Safer than no winterization; less flexible than full active winter. |
| Spring startup inspection | Late March through April after final frost risk passes | Pressure test all zones; check every head; inspect backflow preventer; adjust controller schedule for spring watering needs. |
Spring Startup: What to Check After Winter
Whether you performed a full blowout or kept the system active through winter, a thorough spring startup inspection in late March or April (after final frost risk has passed) sets the system up for a successful irrigation season. The spring inspection catches any freeze damage that occurred despite winterization, identifies heads that settled or were damaged over winter, and confirms the controller schedule is appropriate for the spring watering period before Oklahoma’s summer heat arrives.
Spring startup checklist:
- Restore the irrigation water supply. Open the main irrigation supply valve slowly — not all at once. Gradual pressurization reduces the risk of a pressure spike damaging components. Allow the system to reach operating pressure before running any zones.
- Inspect the backflow preventer. Look for cracks, weeping at the test cocks, or any deformation of the housing. A backflow preventer with internal freeze damage will often leak at the test cocks or weep from the housing body when pressurized. Address any damage before running zones.
- Run each zone individually. Walk each zone while it is running and observe every head for proper rise, arc coverage, and absence of base leaks. Note any heads that are not rising, are spraying erratically, or have been damaged over winter.
- Check and adjust controller programming. Confirm the schedule is set appropriately for spring — Bermuda and Zoysia lawns do not need heavy irrigation until they green up in May; overwatering a dormant lawn in March encourages weed germination and fungal activity.
- Schedule soil testing. Complete Lawn Care recommends annual soil testing for every property in our service area, and spring startup is the ideal time to collect samples. Soil test results inform fertilization timing and irrigation scheduling adjustments for the coming season.
Irrigation Winterization Service Throughout the Tulsa Area
For more than 25 years, Complete Lawn Care has provided irrigation service for homeowners throughout Tulsa, Broken Arrow, Bixby, Jenks, Owasso, and Sand Springs. Our team performs blowout winterization services, installs freeze sensors and heat tape for active winter protection, and conducts spring startup inspections that catch and correct winter damage before it affects the irrigation season.
We bring the same science-based, intentional approach to irrigation service that we apply to every aspect of lawn care. Our programs are continually refined based on real-world results — and after 25 years of Oklahoma winters, we have seen exactly what happens to irrigation systems that were not properly protected and what it takes to protect them correctly. Every service call is intentional.
Whether you want a reliable blowout to protect your system through winter or you want to set up your system for protected active winter operation so you can keep watering fall plantings through the season, we will help you choose the right approach for your property and do it correctly.
Ready to Winterize Your Tulsa-Area Irrigation System?
Contact Complete Lawn Care at completelawncaretulsa.com or call (918) 605-4646. We serve Tulsa, Broken Arrow, Bixby, Jenks, Owasso, and Sand Springs and will get your system through the winter and ready to perform next spring.
Experience. Science. Intentional Lawn Care — That’s the Complete Lawn Care Difference.